If you’ve ever visited a website and noticed a little lock icon next to the URL, you’ve encountered a secure website with an active SSL certificate. That small lock symbolizes trust and security. But what happens when that lock turns into a “Not Secure” warning? It’s a situation you want to avoid at all costs and you need to learn how to enable your SSL in Squarespace. In this guide, we’ll explain why SSL is important for your Squarespace website and provide a step-by-step process for enabling it. Let’s start the journey of how to enable your SSL in Squarespace.
Understanding SSL, in a Nutshell
before diving into the guide on how to enable your SSL in Squarespace, make sure you know about SSL. SSL, or Secure Sockets Layer, is a technology that ensures the connection between your web browser and the website you’re visiting is secure. You can easily spot an active SSL by looking at the website’s URL; it should start with “https://” instead of “http://,” and there’s usually a reassuring little green padlock next to the URL. Clicking on this padlock often reveals a message confirming that the connection is secure. Click here to learn more about HTTP and https.
Why SSL is Crucial
SSL is not just about security; it’s about safeguarding your data and the data of your website visitors. Here’s why it matters:
- Data Security: SSL encrypts sensitive information like login details and credit card data, ensuring that malicious actors can’t intercept or steal it.
- Data Integrity: SSL prevents tampering with data sent through your website, such as forms and messages.
- SEO Ranking: Google values website security. If your website lacks an active SSL certificate, it can lead to a drop in your search engine rankings.
In essence, SSL is not just a security measure; it’s a vital component of your website’s success.
How to enable your SSL in Squarespace
If your website is hosted on Squarespace, you’re in luck. The platform makes enabling SSL a breeze, and you can get it up and running with just a few clicks. Here’s how:
- Log in to Your Squarespace Account: Begin by logging in to your Squarespace account and select the website you want to secure.
- Access the Settings: In the dashboard, navigate to the ‘Settings’ section.
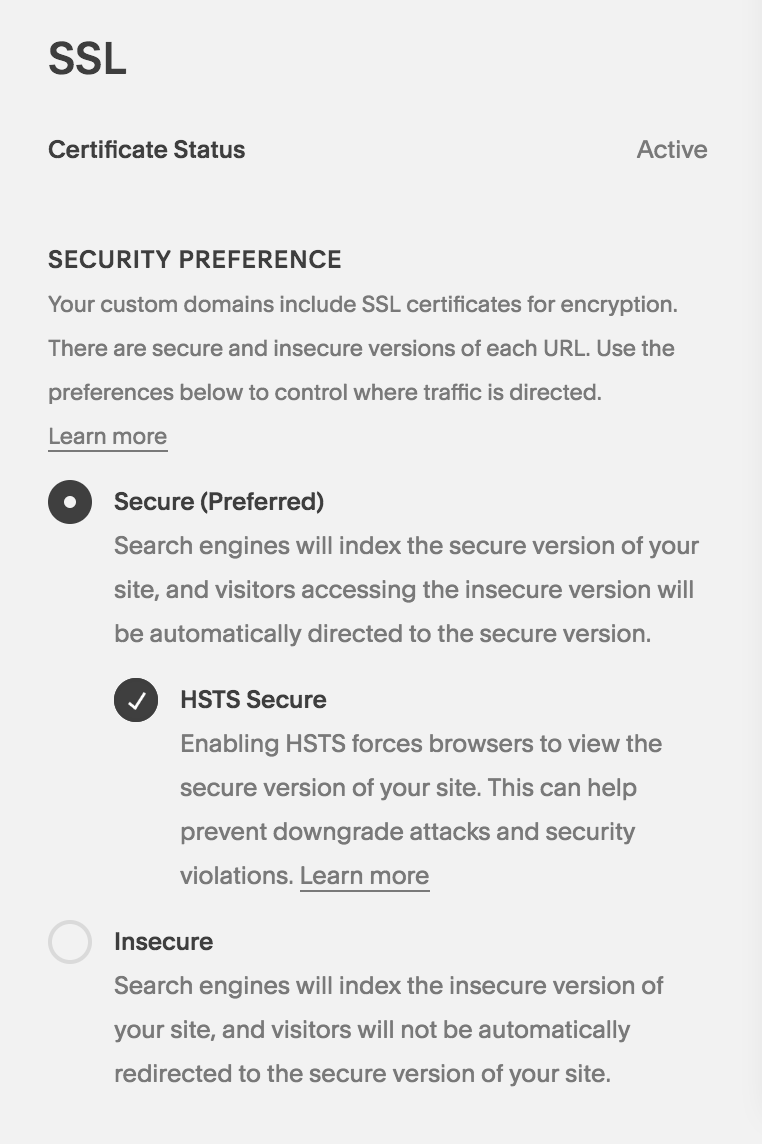
- Enable SSL: Under ‘Settings,’ go to ‘Advanced,’ and you’ll find the ‘SSL’ option. Click on it.
- Select Secure and HSTS Secure: In the SSL settings, ensure you select both ‘Secure’ and ‘HSTS Secure.’ These settings enhance the security of your website.

That’s it! Squarespace takes care of the technicalities, and with these simple steps, you’ve made your website significantly more secure.
How to add a button to your announcement bar
In conclusion, securing your Squarespace website with an SSL certificate is not just a choice; it’s a necessity. It not only establishes trust with your visitors but also ensures that your website is in good standing with search engines like Google. With Squarespace’s user-friendly interface, you can protect your website and reap the benefits of a safer and more reputable online presence. So, take a moment to enable SSL on your Squarespace website – it’s a simple but essential step for success.


